Crosley Turntable Instruction Manual: A Comprehensive Guide
Welcome! This manual details setup‚ operation‚ and maintenance for your Crosley turntable‚ covering popular models like Voyager‚ Aria‚ and C10. Enjoy your vinyl experience!
Crosley has become synonymous with accessible vinyl playback‚ offering a diverse range of turntables from portable suitcase models to more sophisticated audiophile-focused designs. Initially known for affordable‚ entry-level players‚ Crosley has expanded its offerings to cater to a wider audience.
These turntables provide a convenient gateway into the world of vinyl‚ blending retro aesthetics with modern features like Bluetooth connectivity and built-in speakers. Whether you’re a seasoned collector or a first-time listener‚ a Crosley turntable aims to deliver a user-friendly and enjoyable experience. This guide will help you unlock its full potential.
Understanding Crosley Models
Crosley offers a broad spectrum of turntable designs‚ each tailored to different needs and preferences. From the portable Voyager and Aria‚ known for their integrated speakers and Bluetooth capabilities‚ to the more traditional C10‚ emphasizing audio fidelity.

Models like the Bermuda and C65 provide versatile options with wireless speaker pairings. Understanding these distinctions is crucial for selecting a turntable that aligns with your listening environment and desired features. Each series balances affordability‚ style‚ and functionality‚ making Crosley a popular choice for both newcomers and enthusiasts.
Popular Crosley Turntable Series: Voyager
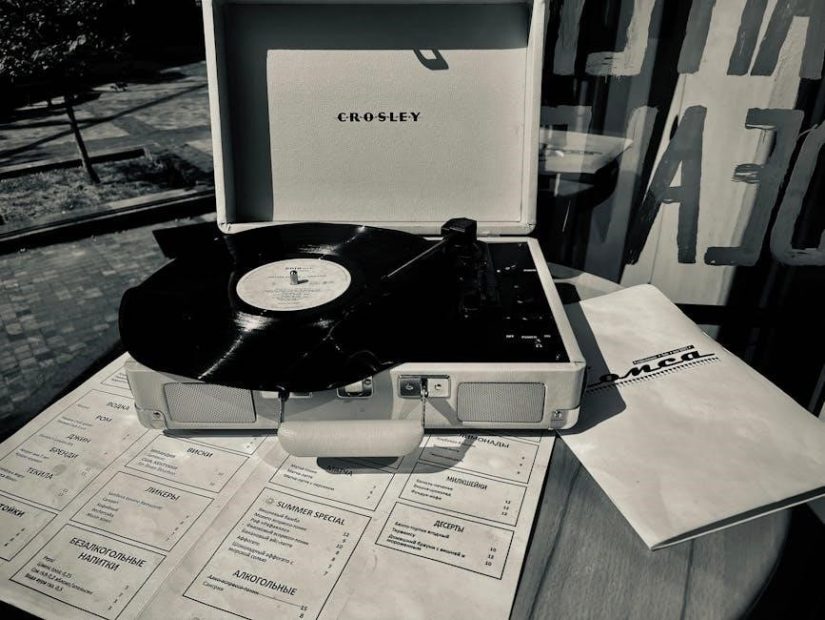
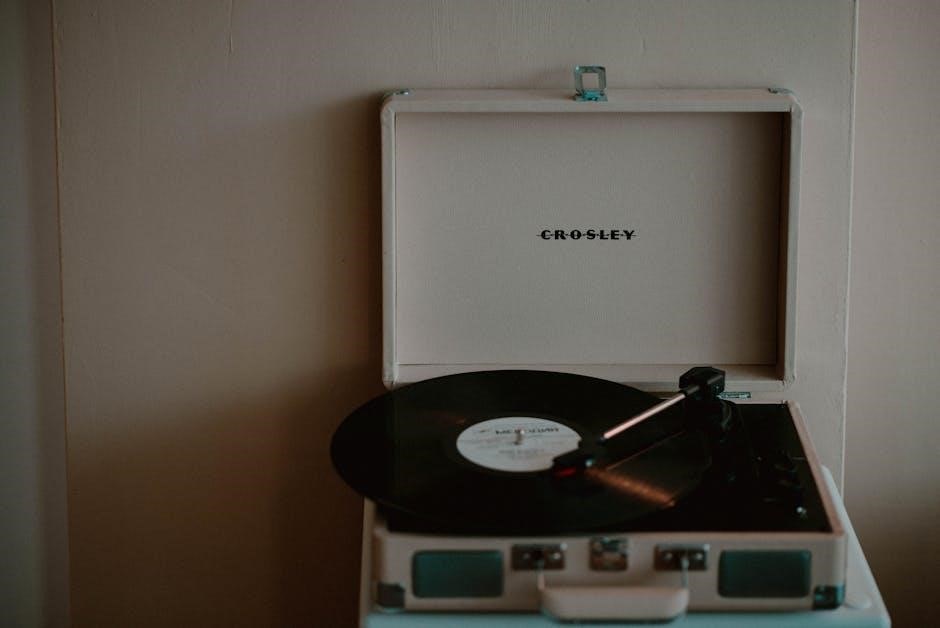
The Voyager series embodies portability and convenience‚ featuring built-in Bluetooth and speakers. This makes it ideal for casual listening and on-the-go enjoyment. Available in various colors‚ the Voyager’s suitcase-style design is instantly recognizable.
It’s a gateway into vinyl for many‚ offering ease of use without sacrificing core functionality. While not aimed at audiophiles‚ the Voyager provides a charming and accessible entry point to record playback. Its affordability and stylish aesthetic contribute to its widespread appeal.
Popular Crosley Turntable Series: Aria
The Aria series blends classic turntable aesthetics with modern features‚ functioning as both a record player and a multimedia center. It boasts built-in speakers‚ Bluetooth connectivity‚ and auxiliary inputs for versatile audio options.
The Aria’s design is more refined than the Voyager‚ appealing to those seeking a stylish addition to their home décor. It offers a step up in audio quality and functionality‚ bridging the gap between casual listening and more dedicated vinyl setups. It’s a popular choice for its all-in-one convenience.
Popular Crosley Turntable Series: C10
The C10 represents Crosley’s attempt to appeal to audiophiles‚ offering a more traditional turntable experience. It features a belt-drive system‚ adjustable counterweight‚ and anti-skate control for precise tracking and improved sound quality.
Unlike suitcase models‚ the C10 requires separate speakers‚ allowing users to customize their audio setup. It’s designed for those who prioritize sound fidelity and are willing to invest in a more sophisticated vinyl playback system. It’s a significant step up in performance from other Crosley lines.

Setting Up Your Crosley Turntable
Initial setup is crucial for optimal performance. Begin by carefully unboxing all components and verifying everything is present. Connect the turntable to a power source‚ ensuring the voltage matches your local supply.
Next‚ consider your speaker connection options – Bluetooth‚ RCA outputs‚ or auxiliary inputs. Proper leveling is essential; use a spirit level to ensure a stable‚ vibration-free surface. Following these steps will guarantee a smooth and enjoyable listening experience with your new Crosley turntable.
Unboxing and Component Check
Carefully open the box and remove all packaging materials. Verify the presence of the turntable base‚ platter‚ counterweight (if applicable)‚ dust cover‚ power adapter‚ and any included accessories like RCA cables.
Inspect each component for any visible damage sustained during shipping. A quick visual check ensures all parts are accounted for before proceeding. Retain the original packaging for potential future transport or warranty claims. Confirm the stylus is securely attached to the tonearm.
Connecting the Turntable to Power
Locate the DC power input on the rear of the turntable. Connect the provided power adapter to this input‚ ensuring a snug fit. Then‚ plug the adapter into a standard wall outlet.
Verify the outlet provides the correct voltage as indicated on the power adapter. Avoid using extension cords if possible; if necessary‚ use a heavy-duty one. Some models may have a power switch; ensure it’s in the ‘off’ position before plugging in.
Speaker Connection Options

Crosley turntables offer versatile speaker connectivity. Many models feature built-in speakers for immediate use. For enhanced audio‚ connect external speakers via RCA outputs to an amplifier or powered speakers.
Bluetooth connectivity allows wireless pairing with compatible speakers. Utilize the auxiliary input/output for connecting other audio devices. Ensure proper impedance matching when using external speakers to prevent damage and optimize sound quality. Refer to your speaker’s manual for guidance.
Operating Your Crosley Turntable
Begin by ensuring the turntable is placed on a level surface. Power on the unit and gently place a vinyl record onto the platter. Carefully position the tonearm and lower it onto the record’s edge to initiate playback.
Adjust the volume to your desired level. Utilize pitch control for speed adjustments if needed. Remember to lift the tonearm and return it to its rest when finished listening‚ preventing unwanted wear on both the record and stylus.
Powering On and Off
To power on your Crosley turntable‚ locate the power switch‚ typically found on the rear or side panel. Flip the switch to the “On” position. A power indicator light will illuminate‚ confirming operation.
When finished listening‚ return the tonearm to its rest and switch the power off using the same switch. Disconnecting the power cord is recommended for extended periods of non-use‚ conserving energy and protecting the unit from potential power surges.
Placing and Leveling the Turntable
Optimal placement is crucial for sound quality and preventing skipping. Position your Crosley turntable on a stable‚ level surface‚ away from direct sunlight‚ heat sources‚ and vibrations.
Use a bubble level to ensure the turntable is perfectly horizontal. Adjust the feet‚ if adjustable‚ until the bubble centers. An unleveled turntable can cause tracking issues and premature wear on your vinyl records and stylus. Proper leveling enhances performance.
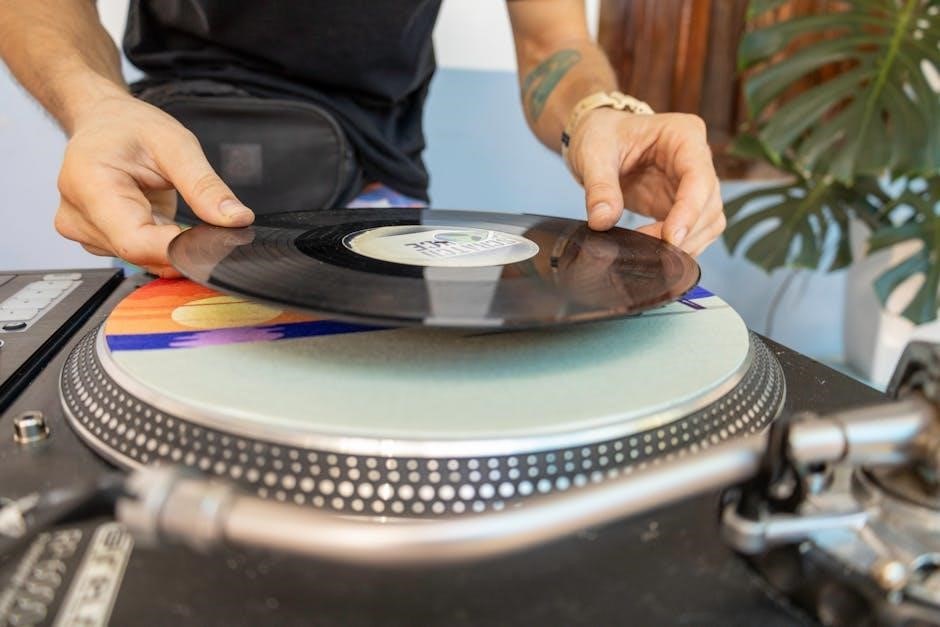
Playing Vinyl Records
Carefully place your vinyl record onto the turntable platter. Ensure the spindle aligns with the record’s center hole. Gently lower the tonearm onto the record’s edge using the cueing lever.
Select the correct speed (33 ⅓ or 45 RPM) based on your record. The turntable will begin playing. To stop‚ raise the tonearm with the cueing lever and return it to its rest. Enjoy the warm‚ rich sound of vinyl!
Understanding Turntable Features

Crosley turntables often include built-in Bluetooth connectivity‚ allowing wireless streaming to speakers or headphones. Auxiliary input/output functions enable connection to external audio devices.
The headphone jack provides private listening. Some models feature pitch control for adjusting playback speed. Explore these features to customize your listening experience. Many Crosley models offer versatile playback options‚ blending classic vinyl with modern technology for a comprehensive audio solution.
Built-in Bluetooth Connectivity
Bluetooth functionality allows wireless connection to speakers and headphones‚ expanding your listening options beyond built-in speakers. To pair‚ activate Bluetooth on your device and select your Crosley turntable from the available devices list.
Ensure the turntable is in Bluetooth pairing mode‚ often indicated by a flashing light. Once connected‚ enjoy seamless audio streaming. This feature provides convenience and flexibility‚ blending classic vinyl playback with modern wireless technology.
Auxiliary Input/Output Functions
The auxiliary input allows connection of external audio sources‚ like smartphones or MP3 players‚ to play through the turntable’s speakers. Use a standard 3.5mm audio cable to connect your device to the “Aux In” port.
The auxiliary output enables connection to external speakers or amplifiers for enhanced sound quality. Connect using a 3.5mm cable to the “Aux Out” port. These functions broaden the turntable’s versatility‚ offering diverse audio playback options.
Headphone Jack Usage
For private listening‚ utilize the 3.5mm headphone jack located on the front or rear panel of your Crosley turntable. Plugging in headphones automatically mutes the built-in speakers‚ providing a focused audio experience.
Ensure headphones are compatible with a 3.5mm connector. Adjust the volume on both the turntable and your headphones to a comfortable level. Disconnect headphones when not in use to restore sound to the speakers.
Troubleshooting Common Issues
Experiencing problems? This section addresses frequent concerns. No sound? Check power‚ speaker connections‚ and volume settings. Skipping records? Ensure the turntable is level‚ the stylus is clean‚ and the record isn’t warped.
Speed issues? Verify the correct speed selection (33/45 RPM). If problems persist‚ consult the warranty information or contact Crosley support for assistance. Regular maintenance prevents many issues!
No Sound Output
Silence when you expect music? First‚ confirm the turntable is powered on and the volume is turned up on both the unit and connected speakers. Inspect speaker cables for secure connections. If using Bluetooth‚ ensure proper pairing.
Test with different speakers or headphones to isolate the issue. Check the auxiliary cable if applicable. A faulty stylus can also cause silence; inspect it carefully.
Skipping or Repeating Records
Is your record jumping or stuck in a loop? Ensure the turntable is on a level surface to prevent uneven tracking. A dirty record can cause skipping; clean the vinyl with a suitable brush and solution. Check the stylus for debris or damage – a worn stylus struggles to track properly.
Adjust the tracking force if your model allows. Warped records are prone to skipping; try a record weight.
Turntable Speed Issues
Is your record playing too fast or too slow? First‚ verify the speed selector switch is set to the correct RPM (33⅓‚ 45‚ or 78) for your record. Belt-drive models may experience speed fluctuations if the belt is stretched or slipping; consider a replacement.
Some Crosley turntables feature pitch control for minor speed adjustments. Ensure the platter spins freely and isn’t obstructed. If problems persist‚ contact Crosley support for assistance.
Crosley Turntable Maintenance
Keep your Crosley turntable performing optimally! Regularly clean the dust cover and platter with a soft‚ dry cloth. Avoid harsh chemicals. The stylus (needle) is crucial; inspect it frequently and replace it when worn to prevent record damage.
For belt-drive models‚ periodically check the belt for stretching or cracking‚ replacing it as needed. Proper maintenance extends the life of your turntable and preserves your vinyl collection’s sound quality.
Cleaning the Turntable
Maintaining cleanliness is key! Gently wipe the turntable’s exterior with a soft‚ dry cloth. For the platter‚ use a similar cloth‚ ensuring it’s free of debris. Avoid abrasive cleaners or liquids near sensitive components; The dust cover benefits from occasional cleaning with a plastic polish.
Regular dusting prevents scratches and ensures optimal performance. Always disconnect the power before cleaning. A clean turntable contributes to better sound and prolongs its lifespan.
Replacing the Stylus (Needle)
A worn stylus impacts sound quality! Carefully disconnect the turntable. Gently remove the old stylus by lifting the front guard. Align the new stylus with the cartridge and push it in until it clicks securely. Ensure proper alignment for optimal tracking.
Handle the stylus delicately to avoid damage. Regular replacement – typically after 1000 hours of use – preserves your vinyl and maintains audio fidelity. Consult your model’s specific instructions for detailed guidance.
Belt Replacement (For Belt-Drive Models)
A stretched or broken belt causes speed issues! Disconnect power and remove the platter. Carefully lift the old belt from the motor pulley and platter spindle. Loop the new belt around both‚ ensuring a snug but not overly tight fit.
Reassemble the turntable‚ verifying the belt runs smoothly without slipping. Proper belt tension is crucial for accurate playback speed. Replacement is recommended every few years‚ or when performance degrades.
Advanced Features & Settings
Unlock your turntable’s full potential! Pitch control adjusts playback speed for fine-tuning. The auto-stop function halts the record at the end‚ preventing damage. Explore tone arm settings for optimal tracking and sound quality.
These features allow customization to your listening preferences and record condition. Experiment to find the ideal settings for your vinyl collection. Refer to your specific model’s documentation for detailed instructions on accessing and adjusting these advanced options.
Pitch Control Adjustment
Fine-tune playback speed! The pitch control slider adjusts the turntable’s rotational speed‚ allowing for minor corrections to match the recording. This is useful for older records or slight speed inaccuracies. Adjustments are typically marked with percentage deviations (+/- 10-20%).
Small adjustments can significantly impact sound quality. Experiment carefully‚ listening for the most accurate and pleasing reproduction. Avoid extreme settings‚ as they can distort the audio or damage your vinyl.
Auto-Stop Functionality
Protect your records! Many Crosley turntables feature an auto-stop function‚ automatically halting playback at the record’s end. This prevents stylus damage and continuous center label spinning. Ensure the auto-stop lever is engaged for optimal operation.
If auto-stop isn’t functioning‚ check the lever position and ensure no obstructions interfere with the tonearm’s return path. Some models allow disabling this feature; consult your specific model’s documentation.
Understanding Tone Arm Settings
Optimize sound quality! The tone arm’s settings significantly impact playback. Counterweight adjustment balances the arm‚ ensuring proper tracking force—too light causes skipping‚ too heavy damages records. Anti-skate compensates for inward pull‚ preventing uneven wear.
Carefully adjust these settings according to your cartridge’s specifications. Incorrect settings can lead to distorted sound or record damage. Refer to your turntable’s manual for detailed instructions and recommended settings for optimal performance.
Crosley Turntable Accessories
Enhance your listening! Several accessories improve your Crosley experience. Stylus replacements are crucial for maintaining sound quality and preventing record damage; choose compatible options. Cleaning kits remove dust and debris‚ preserving vinyl longevity.
Replacement belts (for belt-drive models) ensure proper speed and performance. Explore options like carbon fiber brushes and record weights for further sonic improvements. Crosley offers a range of accessories to personalize and optimize your turntable setup.
Stylus Replacement Options
Protect your vinyl! Crosley offers various stylus replacements‚ categorized by compatibility with specific turntable models. Standard replacements provide reliable performance‚ while upgraded options—like elliptical or diamond-tipped styluses—deliver enhanced detail and tracking.
Consider your listening needs. Genuine Crosley styluses ensure optimal performance. Third-party options are available‚ but verify compatibility. Regularly inspect your stylus for wear; replacement typically occurs after 500-1000 hours of use. A fresh stylus preserves record quality and sound fidelity.
Cleaning Kits and Solutions
Maintain pristine sound! Crosley recommends specialized cleaning kits for both vinyl records and the turntable itself. Kits typically include a carbon fiber brush to remove dust‚ a cleaning solution to lift debris‚ and microfiber cloths for gentle wiping.
Avoid harsh chemicals. Use only solutions specifically designed for vinyl; alcohol-based cleaners can damage records. Regularly clean records before each play to minimize wear and improve audio quality. A clean stylus and turntable platter are equally crucial for optimal performance.
Replacement Belts
Restore your turntable’s drive! Belt-drive Crosley models require periodic belt replacement‚ typically every 2-5 years‚ depending on usage. A worn belt causes speed inconsistencies and sound distortion. Crosley offers replacement belts specifically designed for each model‚ ensuring a proper fit and optimal performance.
Easy installation. Replacement is straightforward; consult your turntable’s diagram or online resources for guidance. Always disconnect the power before attempting any maintenance. A new belt will revitalize your listening experience!
Safety Precautions
Protect your investment and yourself! Handle vinyl records with care‚ avoiding fingerprints and scratches. Always hold records by the edges. Regarding electrical safety‚ ensure the turntable is properly grounded and use a surge protector. Never expose the unit to moisture or extreme temperatures.
Proper storage is key. When not in use‚ store the turntable in a clean‚ dry location‚ covered to prevent dust accumulation. Disconnect the power cord during extended periods of non-use.
Handling Vinyl Records Carefully
Preserve your collection! Always handle records by the edges or the label area‚ avoiding contact with the grooves. Fingerprints deposit oils that attract dust and degrade sound quality. Use a soft‚ lint-free cloth to gently remove dust; avoid abrasive cleaners.
Proper storage matters. Store records vertically‚ not stacked‚ to prevent warping. Keep them away from direct sunlight‚ heat sources‚ and humidity. Clean records regularly to maintain optimal playback performance and extend their lifespan.
Electrical Safety Guidelines
Safety first! Only use the provided power adapter with your Crosley turntable. Ensure the voltage matches your local electrical supply. Never expose the turntable to water or moisture to prevent electric shock. Avoid using damaged power cords or outlets.
Unplug during maintenance. Always disconnect the turntable from the power source before cleaning or replacing parts. Do not attempt to repair the turntable yourself; contact qualified service personnel for assistance. Proper grounding is essential for safe operation.
Proper Storage of the Turntable
Protect your investment! When storing your Crosley turntable‚ place it in a cool‚ dry environment‚ away from direct sunlight and extreme temperatures. Use the original packaging if possible‚ or a padded case for protection during transport.
Secure the tone arm. Before storage‚ secure the tone arm with its locking clip to prevent damage. Avoid stacking heavy objects on top of the turntable. Regularly check for dust accumulation and clean gently before reuse.
Warranty Information
Crosley offers a one-year limited warranty against defects in materials and workmanship from the date of original purchase. This warranty covers component parts‚ but excludes issues caused by misuse‚ accidents‚ or unauthorized modifications.
To make a claim‚ retain your proof of purchase and contact Crosley customer support. Shipping costs for warranty service are the responsibility of the customer. This warranty provides repair or replacement‚ at Crosley’s discretion.
Contacting Crosley Support
For assistance with your Crosley turntable‚ visit the official Crosley Radio website for FAQs and troubleshooting guides. You can also reach their customer support team via email through the “Contact Us” section on their website.
Alternatively‚ phone support is available during business hours – check the website for current times. Be prepared to provide your model number and proof of purchase when contacting support for efficient assistance with any issues.
Resources and Further Reading
Expand your knowledge of vinyl and turntable care! Websites like Rolling Stone and audio enthusiast forums offer reviews and guides on record players‚ including Crosley models. Explore articles discussing the resurgence of vinyl and tips for optimal listening.
For deeper dives‚ research turntable maintenance‚ stylus care‚ and understanding audio components. Online communities dedicated to vinyl collecting provide valuable insights and troubleshooting advice. Enjoy the journey of discovering more about your Crosley turntable!